So here we are… The final part of our series, our Alibaba Ubuntu 16.04 ECS instance is ready, we have NGINX, MariaDB, and PHP7 completing our stack. Our domain is configured and our site is protected with a Let’s Encrypt SSL certificate. We are all ready to install WordPress, happy days!
Completing the previous tutorials is a prerequisite for this one, so if you haven’t completed them yet, then follow the links above and come back here when you’re done.
I would also be remiss to not point out, again, that most everything in this tutorial will work on most cloud providers.
Step 1. Configure NGINX for WordPress
The First thing we need to do is make some slight modifications to our NGINX server blocks. Open the default NGINX configuration file with sudo privileges:
$ sudo nano /etc/nginx/sites-available/default
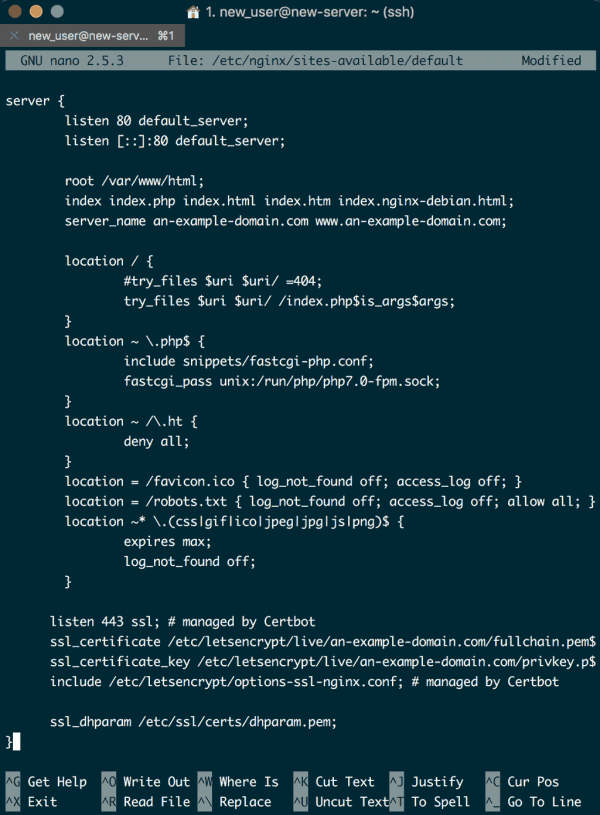
Within the server block we need to add some locations blocks.
Turn off logging requests for /favicon.ico and /robots.txt. Then use a regular expression to match requests for static files, then turn logging off for these requests too, and mark them as highly cacheable since they are generally expensive resources to serve. If you have any other static files you want to cache, add them here too:
server {
    . . .

    location = /favicon.ico { log_not_found off; access_log off; }
    location = /robots.txt { log_not_found off; access_log off; allow all; }
    location ~* \.(css|gif|ico|jpeg|jpg|js|png)$ {
        expires max;
        log_not_found off;
    }
    . . .
}
We also need to make some adjustments inside the location / block.
Comment out the try_files list line, where it returns a 404 error as a default option, and add code that passes control to the index.php file with the request argument instead:
server {
    . . .

    location / {
        #try_files $uri $uri/ =404;
        try_files $uri $uri/ /index.php$is_args$args;
    }

    . . .
}
When you are finished your NGINX configuration file should look like the following:
Make sure to check for syntax errors:
$ sudo nginx -t
If there are none, reload NGINX:
sudo systemctl reload nginx
Step 2. Install PHP Extensions most commonly used with WordPress
Previously we only installed the minimum PHP extensions required to get PHP to communicate with MariaDB and NGINX. However WordPress and its myriad ecosystem of plugins often leverage additional PHP extensions for increased functionality. We will install some of the most popular ones next.
This step is optional, you could install these as and when you need them, but since we are already tweaking the LEMP stack for WordPress, why not do these now?
First update your package repository index, and then install the chosen extensions by entering:
$ sudo apt-get update
$ sudo apt-get install php-curl php-gd php-mbstring php-mcrypt php-xml php-xmlrpc
Once they are finished installing, we need to restart the PHP-FPM process so these new features can be leveraged:
sudo systemctl restart php7.0-fpm
Now PHP and NGINX are ready, we just need to add our Database with MariaDB and we can move on to WordPress.
Step 3. Create a MySQL Database and User for WordPress
WordPress needs a MySQL Database to store site and user information. In the previous tutorial we installedd MariaDB as a drop in, more performant, replacement for MySQL.
Now we need to use MariaDB to create the Database and User for WordPress to use.
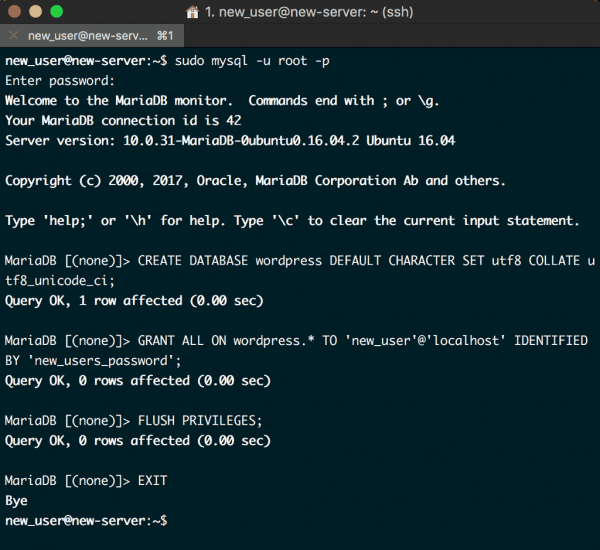
Log in to MariaDB, with root privileges, using the following mysql command:
$ sudo mysql -u root -p
As usual, you will need to enter your superuser password before you can progress.
Now create a Database for WordPress. Name it appropriately, for this tutorial I will be sticking with wordpress as my database name:
MariaDB [(none)]> CREATE DATABASE wordpress DEFAULT CHARACTER SET utf8 COLLATE utf8_unicode_ci;
Next we need to create the user for this database. This user will be exclusive to our new database. I’m just going to use the same username as I have for my superuser, to keep things simple. You should choose whatever username you think is appropriate. I am also using a simple password for the benefit of the tutorial, but yours should be much more secure:
MariaDB [(none)]> GRANT ALL ON wordpress.* TO 'new_user'@'localhost' IDENTIFIED BY 'new_users_password';
Now we have the necessary Database and User account, all we have to do is flush the privileges so that MariaDB knows about the changes we’ve made. Then exit MariaDB:
MariaDB [(none)]> FLUSH PRIVILEGES;
MariaDB [(none)]> EXIT;
If you have followed along exactly, then your terminal should look like this:
Step 4. Configure root directory ownerships
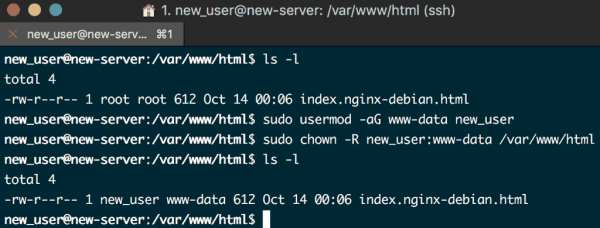
We will be setting up WordPress in the /var/www/html directory, as set up in our NGINX configuration file server block. Change directory to this directory:
$ cd /var/www/html
If we try to import the WordPress files in this directory immediately, then we will receive a permissions error. That is because this directory currently belongs to root user in the root group.
You can verify this by entering the following command to show the owner:
$ ls -l
Your terminal will display the file and directory permissions, owner, date, time, and contents. You should see root root in the output.
We will need to change the owner of the directory and the group the directory belongs to, in order to allow us to write the files we need within.
First, with root privileges, add your superuser to the www-data usergroup, this is the NGINX server’s usergroup. In my case that is new_user:
$ sudo usermod -aG www-data new_user
Next, change the ownership of the /var/www/html directory to your superuser and the www-data usergroup. In the case of my new_user that would be the following command:
$ sudo chown -R new_user:www-data /var/www/html
Once this is done you can check the ownership of the directory again with the same command as previously:
$ ls -l
Now the terminal should show the directory as belonging to your superuser and the www-data usergroup. If everything has been completed correctly, your terminal should look like the following:
We will be revisiting this directory and its ownership once we have installed WordPress, as it currently stands we won’t be able to install themes and plugins once WordPress is up and running. We can do that later.
Install WordPress (Huzzah!!!)
Wait… you have a decision to make. This tutorial is going to show you two ways to install WordPress.
The first is the original way, using curl and editing config files using nano etc. It is trusty and reliable method, and worth going through.
The second is using WP CLI, the awesome command line interface for WordPress, if you haven’t used it before then this is your chance to start. It’s awesome, and, once you get used to it, you can use it to manage all your WordPress sites with a workflow that offers such increased speed and efficiencies that you will never look back.
Step 5. Install WordPress using CURL
Step 5a. Download WordPress
Change into a writable directory, yes I know we just took ownership of the WordPress destination directory, but this is just to be safe:
$ cd /tmp
Now use curl to download the compressed release with the following command:
$ curl -O https://wordpress.org/latest.tar.gz
Then extract the compressed file to create the WordPress directory and structure:
$ tar xzvf latest.tar.gz
Next we need to change the wp-config-sample.php file into the wp-config.php filename needed by wordpress, use the copy command like so:
$ cp /tmp/wordpress/wp-config-sample.php /tmp/wordpress/wp-config.php
We also need to create the upgrade directory needed by WordPress, so that it won’t run into permissino problems later when it tries to do this on it’s own:
$ mkdir /tmp/wordpress/wp-content/upgrade
Okay, now we have a correctly configured and structured WordPress directory in the /tmp directory, we can copy its entire contents into our html root directory. We will use the -a flag to maintain permissions. Notice the . period at the end of our source directory, this indicates that everything in the directory should be copied, including hidden files:
$ sudo cp -a /tmp/wordpress/. /var/www/html
Step 5b. Set up the WordPress Configuration File
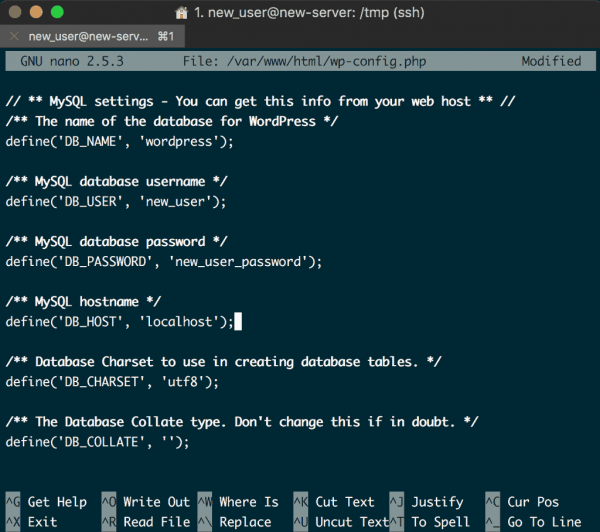
We need to configure some settings in the wp-config.php file so WordPress can talk to our database, and also to secure the installation.
Open the configuration file:
$ nano /var/www/html/wp-config.php
Enter the settings for the database we created with MariaDB earlier. You will need to correctly enter the name of the database, the database user, database user password and localhost, from earlier:
. . .

define('DB_NAME', 'wordpress');

/** MySQL database username */
define('DB_USER', 'new_user');

/** MySQL database password */
define('DB_PASSWORD', 'new_users_password');

/** MySQL hostname */
define('DB_HOST', 'localhost');

. . .
Close the file and save it.
In my case, my wp-config.php now looks like the following, yours should be similar:
The wp-config.php file will also contain a section for secure ‘salt’ keys. It will look like this:
. . .

define('AUTH_KEY',         'put your unique phrase here');
define('SECURE_AUTH_KEY',  'put your unique phrase here');
define('LOGGED_IN_KEY',    'put your unique phrase here');
define('NONCE_KEY',        'put your unique phrase here');
define('AUTH_SALT',        'put your unique phrase here');
define('SECURE_AUTH_SALT', 'put your unique phrase here');
define('LOGGED_IN_SALT',   'put your unique phrase here');
define('NONCE_SALT',       'put your unique phrase here');

. . .
You will need to replace these keys with secure key values. We can get them from the WordPress secret key generator with the following command:
$ curl -s https://api.wordpress.org/secret-key/1.1/salt/
Your terminal will display some unique values that look like the following:

Copy the salt keys.
Open the wp-config.php file, and paste these keys in place of the placeholder values:
$ nano /var/www/html/wp-config.php
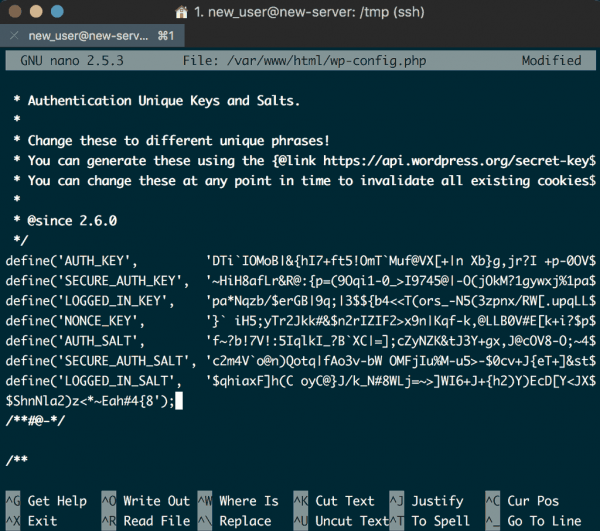
Make sure you close and save the wp-config.php file.
Now you’re ready to complete the installation.
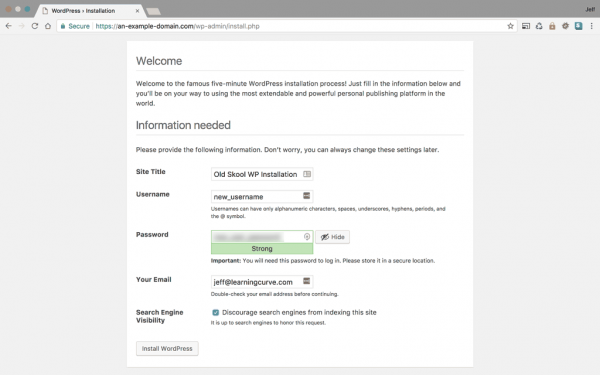
Step 5c. Complete the Famous WordPress 5 Minute Installation through the web interface
The server configuration is complete and teh WordPress directory and Configuration file is prepared, so now you can complete WordPress’s famous 5 minute installation by visiting your domain. Open your browser and navigate to your domain url:
https://an-example-domain.com
You will need to select your installation language, and then you’ll be prompted to complete your site and admin user information:
Click install WordPress and you are done:
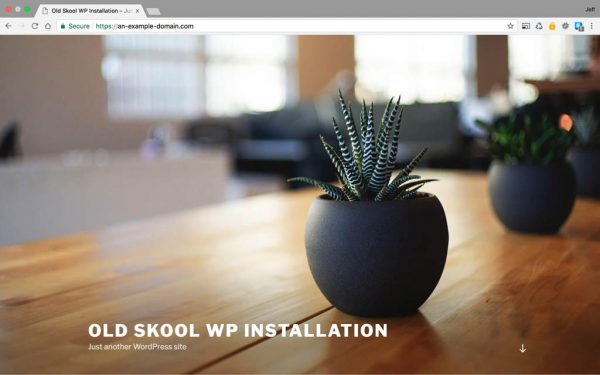
Your WordPress site should be up and running, and secured with an SSL.
Permissions will need some adjusting to allow you to install and delete plugins and themes, and make other WordPress configuration changes, but we can do that later.
Next we shall install WordPress using the fantastic WP CLI.
Step 6. Installing WordPress using WP-CLI
Step 6a. Install WP-CLI
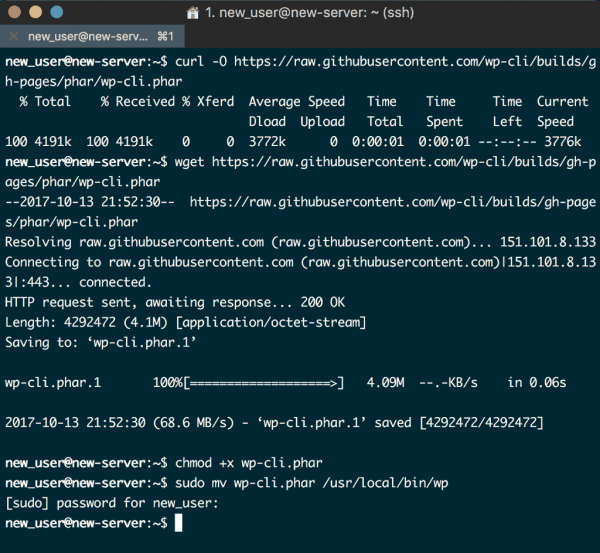
You can download the WP-CLI PHP Archive file wp-cli.phar using either curl or wget commands:
$ curl -O https://raw.githubusercontent.com/wp-cli/builds/gh-pages/phar/wp-cli.phar
or
$ wget https://raw.githubusercontent.com/wp-cli/builds/gh-pages/phar/wp-cli.phar
Next, you need to make the wp-cli.phar file executable, and move it to the /usr/local/bin directory, so that it can be run directly:
$ chmod +x wp-cli.phar
$ sudo mv wp-cli.phar /usr/local/bin/wp
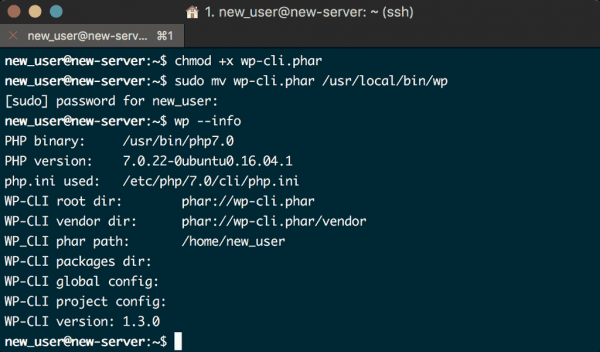
When these commands are completed, your terminal should look like the following:
You can check that it has been installed correctly by checking it’s info:
$ wp --info
If you see something similar to the following, you can proceed:
You will want to activate Bash Completion, this allows you to see all the available WP-CLI commands on the fly.
First, download the bash script into your home directory:
$ cd ~/
$ wget https://github.com/wp-cli/wp-cli/raw/master/utils/wp-completion.bash
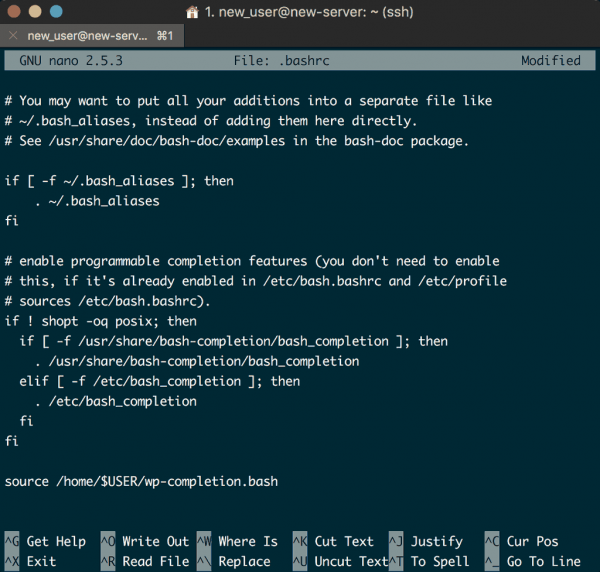
Next open the .bashrc file:
$ nano .bashrc
Add the folllwing line of code at the end of the .bashrc file:
. . .
source /home/$USER/wp-completion.bash
In the nano editor, the file should look like the following:
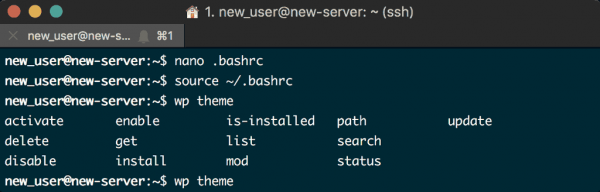
Close and save the file, then run the following command to reload the bash profile:
$ source ~/.bashrc
Bash completion is now enabled, you can test this by typing wp theme, including the trailing space, and then press tab twice. You will see a list of available commands with the wp theme prompt.
Your terminal should be showing:
Step 6b. Install WordPress using WP-CLI
Move to the /var/www/html root directory for the site:
$ cd /var/www/html
This is where we will download the WordPress files. We took ownership of the directory previously, so we shouldn’t run into any errors while downloading the files and unpacking them:
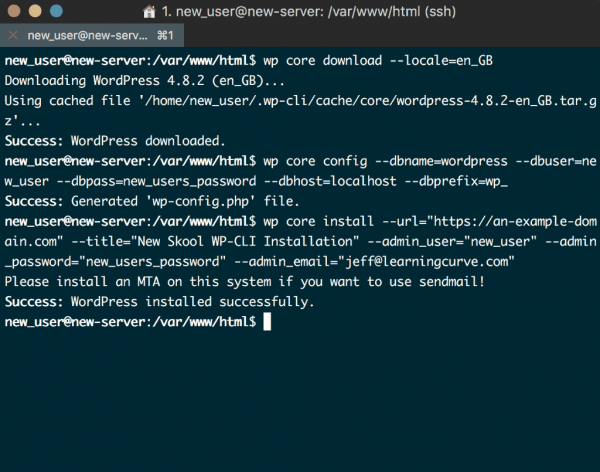
$ wp core download --locale=en_GB
You might think that I am downloading the British English version because I am British. Whilst that may be true, it’s also because there is currently a problem with the –locale=en_US US English download.
At the time of writing this tutorial downloading the US version throws an error during the unpack. I initially didn’t use a locale, which defaults to US English download, so this error had me running in circles until I found a github error log suggesting using a different language pack, and low and behold, it worked.
Since I am British, this is okay, and it’s an opportunity for my US English speaking cousins to learn some proper English – win win!
Now we need to create our wp-config file using our database values:
$ wp core config --dbname=wordpress --dbuser=new_user --dbpass=new_users_password --dbhost=localhost --dbprefix=wp_
Obviously you should use the database values that you created with MariaDB earlier, and not mine. Also notice how we don’t need to bother with the WordPress Salt Key Generator, that’s because WP-CLI does that for us – bonus.
Finally, all we need to do is run the installation with the following command:
$ wp core install --url="https://an-example-domain.com" --title="New Skool WP-CLI Installation" --admin_user="new_user" --admin_password="some_password" --admin_email="email@domain.com"
Again, make sure to use the values for your domain, admin username, password and email. Your terminal should look something like this:
And that’s it…

Seriously, how easy and fast was that? You can use WP-CLI to update WordPress core, plugins, themes, copy whole installations and databases, add admin users so you never get locked out, and so much more. But that is for another article…
We aren’t finished yet though, remember those permissions?
Step 7. Configure Root Directory Permissions for WordPress functions
Log in to your WordPress installation, go to the Plugins menu, and try to delete one of the preinstalled plugins. You should see a pop up box like the following:
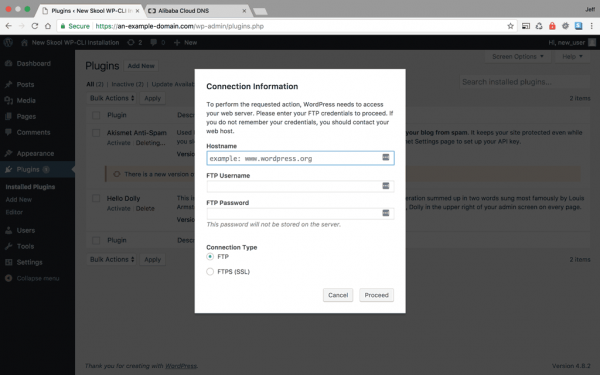
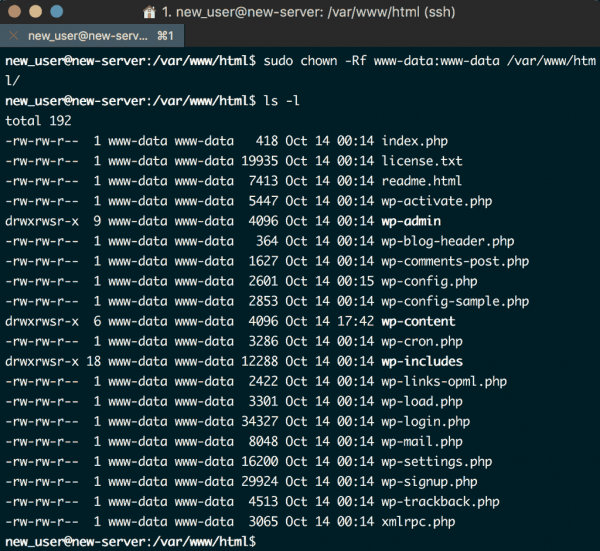
You could configure the SFTP account and credentials, that would work, or you could change the ownership of the WordPress root directory to the www-data NGINX server user and usergroup, using the following command:
$ sudo chown www-data:www-data /var/www/html/
You can check that the www-data user and usergroup has taken ownership with the following command from within the domain root directory:
$ ls -l
You should see the following output:
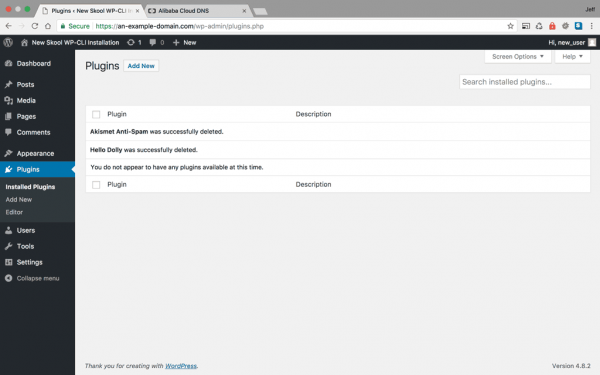
Now you should be able to install and delete plugins, themes, and uploads:
There you go, a fully functional WordPress site with…… hmmmm well, actually, I suppose it isn’t quite functional yet is it?
One of the things with cloud hosting, with any provider, is that while you get a fast server you don’t get things like email functionality provided by the hosting provider.
BONUS ROUND – Emails!
Firstly, for your general email, you should either pay for an email service such GApps, Rackspace, or one of the other providers, or you could roll your own email server.
Email Server DNS records
I chose the latter for myself, and have a Mail-In-The-Box email server running on a Linode. It is quite a simple email server, there are more functional, and complicated, mail server solutions, but in general I direct most of my clients to use a professional hosted service and this is for my personal business use (I’m in China so the more common email solutions can have serious problems).
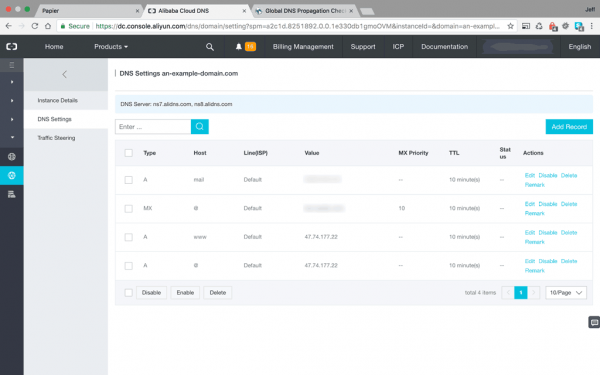
To have my emails directed properly I added an A and MX record to the Alibaba DNS settings like so:
WordPress Transactional Emails
From a WordPress perspective though, what we really need to sort out, is our transactional emails. We need our WordPress installation to be able to send password reset emails, and the like.
To do that, we could install Dovecot, PostFix etc etc on our server. But that would need maintaining and in my case I already have one email server to look after.
So instead, let’s use an online hosted SMTP service, of which there are several. I personally use mailgun so this tutorial will demonstrate how to set their service up on your new install.
Create a Mailgun account and add a domain
If you add a credit card to your account, mailgun has a free tier. On this tier you can send 10,000 emails a month, which is more than enough for anyone’s need of a free tier. If you are sending more emails than that a month, then you can surely afford to pay!
Create a mailgun account at mailgun.com, then login and verify your email address.
They have a free tier that doesn’t require you add a credit card, but is restricted to sending mail to at most 5 whitelisted email addresses. On the other hand, if you do add a credit card you can send up to 10,000 emails a month for free. Can’t say fairer than that!
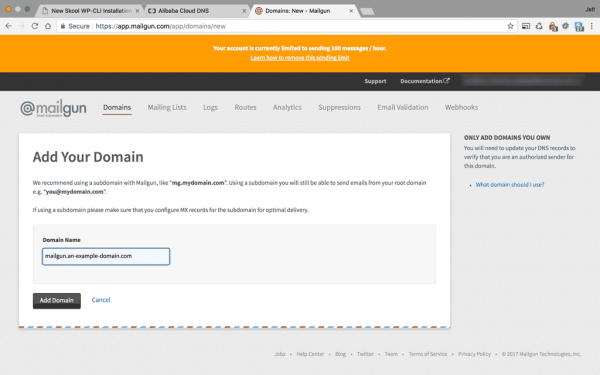
Mailgun needs you to add your domain to their system with a subdomain, they recommend using mg.an-example-domain.com, but I always use mailgun.an-example-domain.com, I prefer to be clear if a little verbose.
Once you have added this domain, they will provide you with some DNS records:
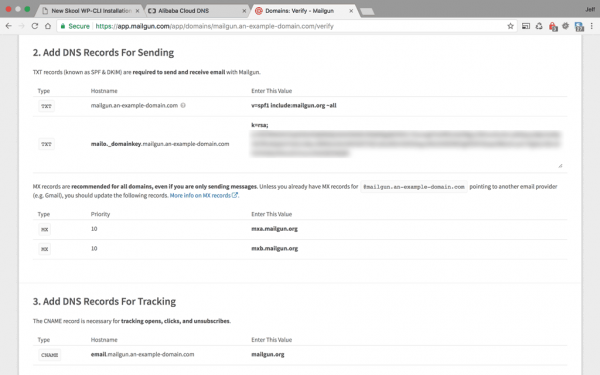
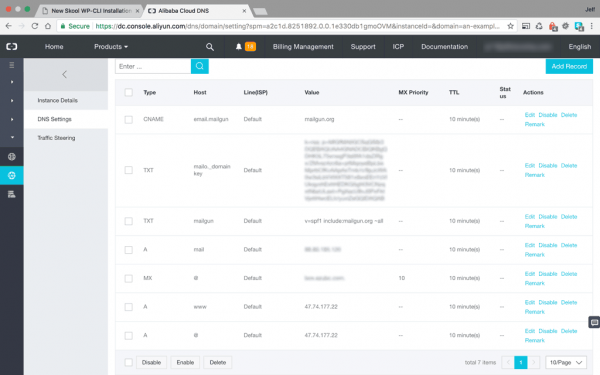
Go to your Alibaba ECS DNS records panel in the console, and add these records:
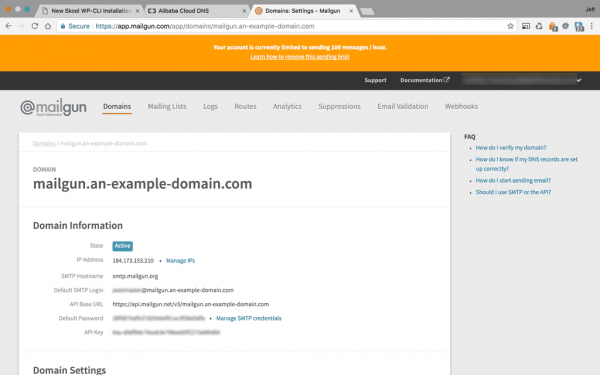
Once your DNS changes have propagated, your mailgun domain settings panel will show your domain as Active, and give you the settings you need to configure one of the many WordPress SMTP plugins:
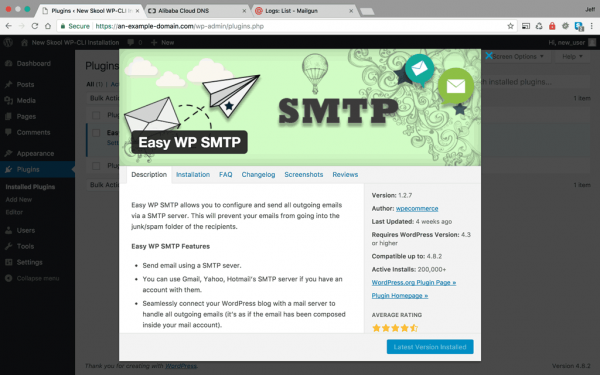
Go back to your WordPress site, and choose an SMTP plugin. Mailgun has one, but at the moment there is a bug causing TLS connection errors, so instead I recommend Easy WP SMTP:
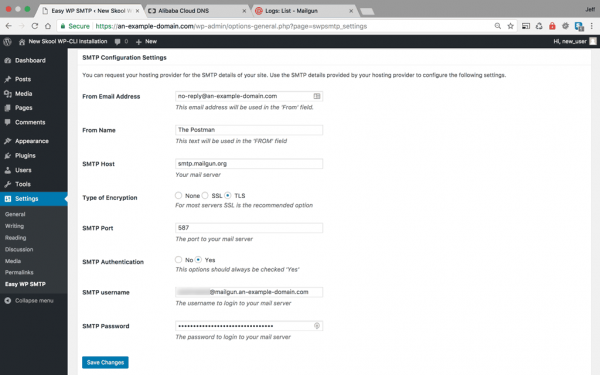
Upon installation, goto the Easy WP SMTP plugins settings page and enter the credentials given to you on the mailgun domain settings page:
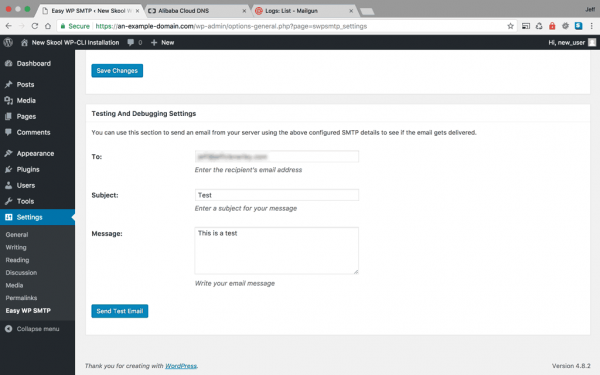
You can send a test mail from a test settings panel directly below the main settings:
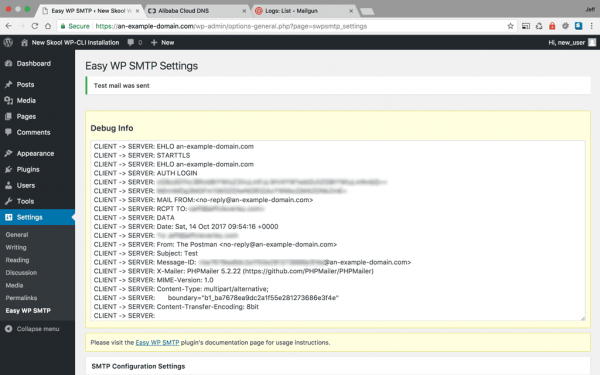
The plugin will display information from the test send, and whether it was succesful or not. If your settings are correct and everything is set up correctly you should see something like this:
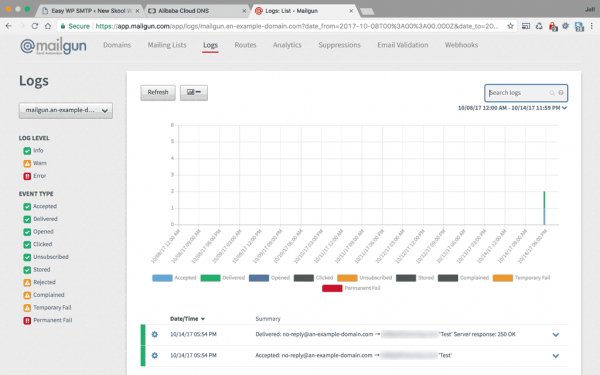
You can also verify that the email has been sent successfully by checking the logs in your mailgun account:
Now we are complete, we have a WordPress site running on a modern, performant LEMP stack, secured with an SSL, and with mailgun transactional emails, all on the Alibaba Cloud!
If you have any questions, or noticed any mistakes or poor configuration practices, please leave a comment.
Thanks
Jeff
Fantastic help throughout! Comprehensive, concise and insightful!
Thanks a lot for taking the time to write it all down step-by-step!
Happy to help Fred. I’ve corrected the omission of the sudo command when securing MariaDB, thanks for pointing that out. I’ve also added a note in the section regarding installing PHP, asking tutorial users to make sure that all the packages installed properly, following the issue you had with the missing PHP CLI.
https://learningcurve.xyz/2017/12/17/alibaba-cloud-2-complete-the-lemp-stack/